Stamps are not just functional tools for marking documents; they can also be personalized accessories that reflect your brand or personal style. Whether for personal use, business branding, or crafting purposes, creating your custom stamp can be an enjoyable and rewarding process. In this tutorial, we’ll take a closer look at different methods to create a custom stamp, starting with an easy-to-use online service like MyStampReady, and then delving into DIY techniques for a more hands-on approach. Let's dive in!
Method 1: Using MyStampReady
Step 1: Visit MyStampReady
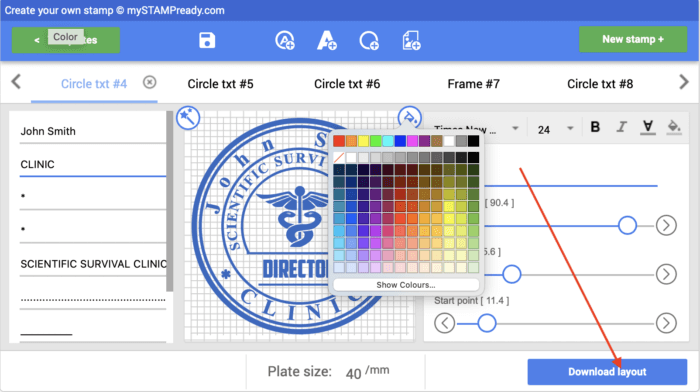
The easiest and most efficient way to create a custom stamp is by using an online service like MyStampReady. This platform provides a user-friendly interface and a variety of tools to design and customize your stamp even if you have zero graphic design experience. Hence making it accessible for both beginners and professionals.
Step 2: Choose Your Stamp Template
Once on the website, browse through the wide selection of stamp templates. MyStampReady offers numerous pre-designed templates for various needs, including business logos, personal monograms, and address stamps.
Step 3: Customize Your Stamp
Use the design tools provided to customize your stamp. You can:
- Add Text: Input your desired text, adjust the font style, size, and alignment.
- Insert Images or Logos: Upload your logo or any image you wish to include in your stamp design.
- Adjust Layout: Modify the arrangement of text and images, ensuring everything fits perfectly within the stamp's borders.
- Choose Stamp Shape: Select from different shapes such as circular, rectangular, or triangular to match your preferences.
Step 4: Preview and Save
Before finalizing your design, take advantage of the preview feature to see how your stamp will look when printed. Make any necessary adjustments, then save your design.
Step 5: Order or Download
You can choose to either order a physical stamp directly from MyStampReady or download the digital file for local production. The platform supports various file formats, making it easy to use with different printing services.
Benefits of Using MyStampReady
- Ease of Use: The platform is intuitive and straightforward, requiring no prior design experience.
- Wide Range of Templates: A diverse selection of templates is great for creativity and customization.
- Professional Results: High-quality designs ensure that your stamp looks professional and polished.
- Customer orientation: If you have any questions or difficulties during the designing process, just contact us by phone, e-mail or WhatsApp (there is a special button on the website for this) and MyStampReady specialists will be happy to give free advice on all issues of editing seal samples and using MSR tools.
Method 2. Using a 3D Printer
For tech enthusiasts, creating a stamp using a 3D printer combines digital design with physical crafting.
Materials Needed
- 3D Printer: A standard 3D printer capable of printing in fine detail.
- Design Software: Programs like Tinkercad, Blender, or Fusion 360.
- Stamp Material: PLA or other suitable filament for 3D printing.
- Ink Pad: For stamping your design.
Steps to Create a 3D Printed Stamp
- Design Your Stamp: Use 3D design software to create your stamp design. Ensure that the design is inverted, as the printing process will create a mirror image.
- Prepare the File: Export your design as an STL file, compatible with most 3D printers.
- Print the Stamp: Load the file into your 3D printer and print the design.
- Finish the Stamp: Once printed, clean up any rough edges and attach the stamp to a wooden block for easier handling.
Advantages of 3D Printing
- Precision: 3D printers can create intricate designs with high accuracy.
- Customization: Easily modify and adjust designs before printing.
- Efficiency: Faster production times for multiple stamps.
Method 3: DIY Rubber Stamp Carving
For those who enjoy hands-on crafting, carving your own rubber stamp is a rewarding process. Here’s how you can do it:
Materials Needed:
- Rubber carving block or eraser
- Carving tools or craft knife
- Pencil and paper
- Ink pad
Step 1: Design Your Stamp
Draw your stamp design on a piece of paper. Simple, bold designs work best for hand-carving. Once satisfied, transfer your design onto the rubber block by pressing the paper onto the surface and rubbing the back with a pencil.
Step 2: Carve Your Design
Carefully carve out the areas of the rubber block that are not part of the design using your carving tools. Start with the outline and then remove the inner areas. Take your time to ensure precision.
Step 3: Test Your Stamp
Ink your carved stamp and make a test print on a piece of paper. Check for any areas that need additional carving or smoothing. Adjust as necessary.
Step 4: Finalize and Use
Once you’re happy with the stamp’s impression, clean off any excess ink and your stamp is ready to use.
Method 3: Digital Stamp Design
For those who prefer a completely digital approach, designing a stamp using graphic design software can be an excellent choice.
Software Options:
- Adobe (News - Alert) Illustrator
- CorelDRAW
- Inkscape (free alternative)
Step 1: Create Your Design
Using vector graphic software, create your stamp design. Utilize tools to add text, shapes, and images. Keep the design bold and simple for better clarity when stamped.
Step 2: Save Your Design
Once your design is complete, save it in a high-resolution format such as SVG, PNG, or PDF. Ensure the file is suitable for printing.
Step 3: Print Your Stamp
You can either print the design on adhesive rubber sheets and attach it to a wooden block or send the file to a professional stamp-making service.
Conclusion
Creating a custom stamp can be as simple or as intricate as you desire. Whether you use an online service like MyStampReady for a quick and professional result, or dive into DIY methods like rubber carving or linoleum block printing, the key is to enjoy the process and let your creativity shine. With the right tools and techniques, you’ll have a unique stamp that perfectly meets your needs.